Wednesday, August 3, 2011

Special Edition: Cake!


My friend Leslie (who you may remember from the White/Brown Sugar-free tartlets) came over Tuesday to make a wedding cake with me! It didn't turn out how we'd planned - but it was about ten hours of fun!

We made a three-layer red velvet cake (I'm going to try to make it less allergenic - it was DELICIOUS), which was a lot of fun, except for the occasional dye spills (sorry mom!).
Here's Leslie making the batter, and the cake sans decoration:


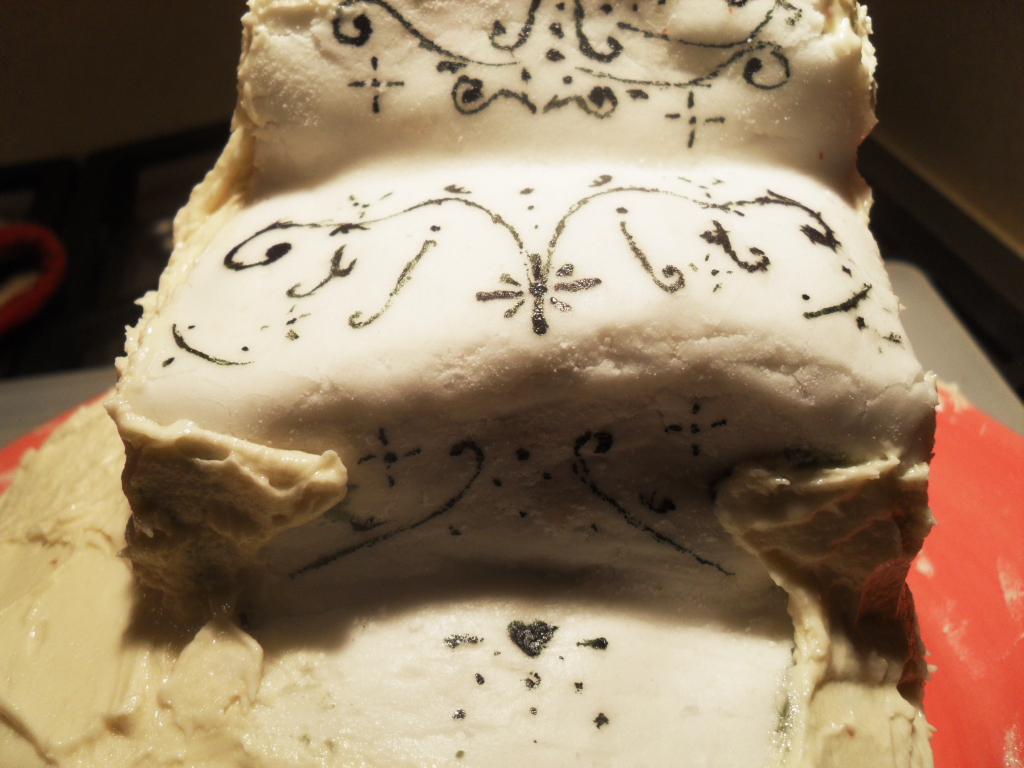
We had planned to cover it in fondant, but we ran into a little bit - actually, about four hours' worth - of trouble in making it, given that we weren't sure how to adapt the recipe to use Agar powder instead of gelatin (vegetarianism isn't usually this hard!). We ended up covering part of the cake in the fondant...stuff... and I painted that, as you can see in the first picture and in some of the following pictures.


After realizing that we just hadn't made the fondant pliable enough, we opted to make buttercream frosting, which we did our best in neatening around the fondant. It was late by that time, and it had been about nine hours, so we were a little tired at this point - but the result was pretty and it was delicious!


It's a cake! The painting was done in black food dye, and yes, those are painted fondant cufflinks on the top!

I would definitely love to give this cake another try in the making, but next time, we need to be sure of how we're going to make and set everything up, and have thicker cake layers. I'd love to do more cake painting - not surprisingly, if you know me, I love details like that - and I think that it would be fun to do that on more of a large canvas. Next time, though, we'll do a different fondant recipe, or maybe marzipan, so that we can actually cover the cake in it - something more pliable! No matter, though, it came out nicely.


It wasn't the most successful experiment I've done, meaning that it didn't go according to plan, but it came out rather prettily and it was absolutely delectable. I brought it out to the block party, where it was a hit, and my other friend Riley downed her slice of cake like it was do or die.

If anyone has suggestions for vegetarian fondant, I'd love to hear them! I'll leave you off here with a close-up of the painted parts. See you at the next challenge!

Saturday, July 30, 2011

July 30: Gluten-free Cake Truffles!

This one wasn't a challenge, but merely born out of curiosity and boredom, but it was fun!

As usual, a rich chocolate desert - but it would work with any cake, this is just a lovely, rich dairy-free and flourless cake. For the record, the cake would be FABULOUS on its own - it's a prize of a fudge cake.

For the bottoms:
2/3 cup chocolate chips of your choice of chocolate


For the cake:
1/3 cup margarine
2/3 cup sugar
3/4 tsp vanilla
2/3 cup cocoa
1/2 tsp baking powder
Two pinches salt
A little less than 1/3 cup cold water

For the covering:
1 cup chocolate of your choice
1/3-1/2 cup milk (I used nonfat Lactaid)
Vanilla extract to taste

To make the bottoms:
For the bottom, melt your favourite kind of chocolate and pour onto parchment paper in small semi-rectangular spots, a bit bigger than the cake cubes. Freeze to harden.

To make the cake:
Preheat oven to 350 degrees.
Grease a cake pan - the larger, the better - you want the cake to be about an inch, maximum, in the end.
In a bowl, cream the butter and sugar. Add the eggs and vanilla (and a dash of almond extract if you like it), and beat well. Combine the flour, cocoa, baking soda, and salt separately and add alternately with the water. Beat well. Pour the batter into the pan/s and bake until a toothpick inserted in various points comes out clean. Let cool completely.
Once cooled, cut into medium-small cubes (just under an inch) and then place them on the bottoms and cover them (see below).

To make the covering:
Melt and mix. Pour over the cake and freeze it all to let it set.

Refrigerate - the chocolate covering melts.

Thursday, July 28, 2011

July 28: Low-fat, dairy-free seasonal Fruit Puffs!


Here's one for Miss Marple's Friend, who requested a low-fat dessert with a "plus" for seasonal fruit.
With that, the first thing I thought of was a low-fat fruit tartlet, but decided to opt for something a little less traditional.
For this recipe, I tweaked around a cream puff recipe to get this delicious little fruit bomb!

These aren't particularly sweet, but are a wonderful, light summer treat, perfect for a picnic or just for noshing on the deck with a good book (my personal choice).

You can fill them with either fresh fruit (sprinkled with sugar if you wish), or the filling recipe below.


For the puff:
1 1/3 cup water
1/2 cup margarine (as always, butter is interchangeable if you wish)
1/4 tsp salt
2 tsp sugar
1 cup plus 3 tbsp flour
4 eggs

For the filling:
3 sliced nectarine (or peach)
1 1/2 tsp maple syrup or to taste
4 good shakes of cinnamon or to taste

To make the puff:
Preheat oven to 425 degrees.
In a medium saucepan, bring the water to a boil. Add the margarine and salt and mix vigorously to melt. Bring back to a boil and add the flour all at once. Stir vigorously until the whole thing turns into a sort of ball-thing. Take off of heat and place in a bowl (the colder the better, since it's hot).
Add eggs one at a time, mixing EXTREMELY thoroughly after each addition. Each one should thin the batter at first, but don't worry - keep mixing until the batter thickens. It will. Add sugar and mix thoroughly.
Now, I put them in the oven in two ways: eight delicious puffs were dropped by the tablespoon onto a greased baking sheet, and eight were placed in greased cupcake tins (NOT in the papers!). I suggest putting them on the pan - the cupcake tins ones look sort of really silly and aren't very good for filling.
If you put them on the pan, they'll look really flat - don't worry, they puff up nicely. Bake for 20 minutes or until they look dry with no beads of moisture.
Cool on rack.

To make the filling:
Over low heat, cook the nectarine until soft. Once soft, add the maple syrup and cinnamon. Stir vigorously until hot and very, very soft. Take off of heat and let cool to desired temperature.

To fill, cut open the puffs - they naturally have a cavity once they bake. Fill very full and fill immediately before serving.

Makes 16 puffs.

Monday, July 25, 2011

July 25: No-chocolate, No-vanilla Crumb Top Mini Cupcakes!


This one is for my friend Emily, who originally asked for a pesto dessert.
Anyways.

Crumb-top mini cupcakes! These are among the least hypoallergenic things that I've baked, but they are truly delicious. If apples are in season, I highly suggest mixing tiny slices of apples into the batter.


For the cupcake:
1/3 cup vegetable crisco
1/3 cup margarine
1 1/2 cup white sugar
2 eggs
1/2 cup brown sugar
2 1/2 tsp baking powder
1 1/4 tsp cinammon
1/4 tsp nutmeg
1 1/4 cup yogurt
1/4 cup fat-free Lactaid/Milk
1/8 cup apple cider (optional)
3 cups flour

Topping:
3/4 cup flour
5 tbsp butter/margarine
2 1/4 tsp cinammon
3/4 cup brown sugar

To make the cupcakes:
Preheat oven to 350 degrees.
In a large bowl, cream the butter, shortening and sugar until light and fluffy. Add eggs and mix thoroughly. Mix together the dry ingredients and add alternately with the yogurt and milk. Mix thoroughly.
Spoon into mini-cupcake pan about 1/3-1/2 of the way. They puff up a lot!

To make the topping:
Mix together all of ingredients in a bowl with your hands into combined to the desired texture. Sprinkle gratuitously - and I mean GRATUITOUSLY - on the cupcakes.

Bake until a pick comes out clean. 

Makes nearly 3 dozen mini cupcakes. 

Sunday, July 24, 2011

July 24: Gluten- and White/Brown Sugar-free, Dairy-Free Chocolate Fruit Tartlets!


This one is done as per the request of my friend Nikki!

My friend Leslie came over to bake this one with me. We were going to try to not make this one chocolatey, but we're having trouble thinking of a non-nut flour alternative to wheat that isn't cocoa.

Note: Make sure to grease your tartlet pans! Otherwise they will yield delicious brownies that are impossible to remove.


Filling:
18 very small strawberries (6 regular size strawberries), smashed to a pulp
Juice of 1 1/2 lemon
12 lemons, zested (Note: if this is too much, as it may be, you can mess with the strawberry/lemon ratio. More strawberries is delicious too!)
3/4 cup coconut
1 cup honey
Strawberries for garnish

Tarts:
1 cup honey
1/2 cup cocoa
A pinch salt
2 egg whites
1 tsp vanilla

To make the tarts:
Preheat the oven to 350 degrees.
In a medium-size bowl, using an electric mixer, mix together honey, cocoa, and salt until thoroughly mixed. Add egg whites and vanilla and beat until mixed. Do not over-mix - the egg whites will stiffen. Fill up tartlet pans halfway and bake for 10 minutes or until a toothpick inserted in the center of the tartlet comes out clean.
Remove and let cool in tartlet pans; after a few minutes, remove from pans and let cool on a rack.

To make the filling:
Mix all ingredients but strawberries over heat and stir until they all stick together. Add strawberries and make sure they are thoroughly mixed in. Once at the desired consistency, remove from heat and let cool.

To put together:
Poke or scoop and indent into the tartlets once they have cooled. Put in the desired amount of filling and garnish with strawberry slices. Enjoy!

Saturday, July 23, 2011

July 23: Egg-, Gluten-, and Dairy-Free Chocolate Shortbread!


My first dare: bake something without eggs and wheat, and preferably without dairy, too.

Um, what?

I'd made two flourless desserts in my life before, and one had cream and the other was a meringue cookie.
So, I set out with my trusty Google and found...nothing that didn't require nut flour.

Since I'm trying to do this all with common ingredients that pretty much everyone has in their kitchen, and I was doing this with 3 hours to go until I had to head to work with the cookies, I wasn't about to do that.

Instead, I found a basic shortbread recipe - a recipe I already knew was eggless. From there, it was a few easy modifications to get to the delicious, four-ingredient cookie that takes less than an hour to get from the bowl to your mouth!

About to go in the oven!

I made them soft and chewy, but they can be made any level of crunchiness - just leave them in the oven for longer. They're incredibly rich, so much so so to be described as "an emotional journey" by one of the other actors (there were barely even any crumbs in the container by the time I left the rehearsal).

Here's the recipe!

1 cup margarine (butter if you are OK with dairy, but it's interchangeable)
2 ½ cups cocoa
¾ cup brown sugar, or to taste (I prefer my cookies very, very cacao-rich; if you like yours sweeter, add more sugar)
1 tsp vanilla extract or to taste

Preheat Oven to 325 degrees.
Cream margarine, brown sugar, and vanilla together until very, very creamy. Add cocoa and mix until completely mixed. At first, it will get very fine, almost like a thick flour. Keep mixing - it takes a couple of minutes. It will eventually start getting into thicker and thicker grain, then it will pebble, and slowly clump all together. By the end, it will be a very, very thick batter – you will probably have to poke it out of the mixer. Use an electric mixer for this – it’s far too thick to do it by hand.
Roll out dough on parchment paper and cut into whatever shape you want and place on a parchment-paper lined baking sheet and bake.
The cookies will begin to get very soft, and then will firm up slightly. Take them out only once they have begun to firm up  for them to be nice and chewy. Let cool on the baking sheet for a few minutes before transferring to a wire rack to cool.
Makes upwards of 2 dozen cookies, depending on size and shape of cookies..

Dare Me!

Want me to whip something up for you?

Here's the basics: I'm willing to cook pretty much anything as long as the dietary requests aren't too far out of this world. Everything I make will be vegetarian, and most can be made vegan on request. Right now, I'm doing desserts, but if the challenge is tempting enough, I'll consider doing other types of food as well.

If your allergies have already been done - no worries! I'd love to do them again!

If that sounds good, and you want me to make you something, I'd be glad to! Just comment (for now - I'll be setting up an email later) with:
  • Your name
  • Your dietary restrictions
  • Anything you really DON'T want in it
  • (Optional) Meal: Dessert/Dinner/Lunch/Breakfast